
Table of Contents
- How to Pack Light for Hiking: Start With the Right Backpack
- How to Reduce Base Weight Before You Leave the Trailhead
- Essential Hiking Gear for Beginners: What to Bring and What to Skip
- How to Pack a Backpack for Balance and Load Distribution
- Best Lightweight Hiking Accessories That Actually Save Weight
- Climate-Specific Packing Strategies for Different Trails
- Post-Hike Gear Audit: How to Pack Even Lighter Next Time
- Conclusion
Last Updated: August 18, 2026
How to Pack Light for Hiking: Start With the Right Backpack
Knowing how to pack light for hiking starts with the backpack itself. At Gear Up & Go, we've seen this mistake constantly: hikers buy an oversized pack, then feel compelled to fill it. Pack volume is the single biggest factor controlling how much you carry. Choose the right size and the pack becomes its own discipline.
Choosing Pack Volume for Your Trip Length
Pack volume is measured in liters, and matching that volume to your trip length is the foundation of any lightweight hiking strategy.
| Trip Type | Recommended Pack Volume | Notes |
|---|---|---|
| Day hike | 10-20L daypack | Water, snacks, layers, first aid |
| Overnight | 30-40L | Compact sleep system required |
| 2-3 nights | 40-55L | Room for shelter and food |
| 4+ nights | 55-70L | Resupply planning reduces this |
Most weekend hikers carry a 65L pack when a 40L would suffice. If your gear doesn't fit in a smaller pack, your gear list needs work, not a bigger bag. A 42L tactical-grade backpack hits the sweet spot for most 2-3 night trips when your kit is dialed in.
According to Leave No Trace Center for Outdoor Ethics, proper trip planning and preparation is the first principle of responsible outdoor recreation, and that includes matching your pack to your actual needs rather than packing for every possible scenario.
How to Reduce Base Weight Before You Leave the Trailhead
Base weight is the weight of your pack without consumables: no food, no water, no fuel. It's the number that reveals whether your gear choices are working.
A minimalist base weight for a 3-season backpacking trip sits under 15 pounds. Ultralight hikers push that under 10 pounds. Neither target is achievable without intentional gear selection before you reach the trailhead.
The 20% Body Weight Rule
The 20% body weight rule states that your total loaded pack weight, including food and water, should not exceed 20% of your body weight. For a 160-pound hiker, that's a 32-pound maximum. Many casual hikers exceed this without realizing it. The fix is reducing base weight so your consumables have room in the budget.
Work backward from your target total weight. If your consumables will weigh 10 pounds on a 3-day trip, your base weight ceiling is 22 pounds. That number tells you exactly how much work your gear selection needs to do. The American Hiking Society trail safety resources references load management as a core factor in reducing injury risk on trail.
Using Digital Weight Tracking Tools
Digital weight tracking tools let you build a virtual gear list, assign weights to each item, and see your total before you pack anything. Several free web-based platforms exist specifically for this purpose:
- List every item you're considering bringing
- Enter the weight of each item in grams or ounces
- Set a target base weight ceiling
- Remove or swap items until you're under target
- Save the list for future trips
This discipline reveals that a "lightweight" item is often the heaviest thing in its category.
Essential Hiking Gear for Beginners: What to Bring and What to Skip
The biggest mistake beginners make is bringing everything they own because they're unsure what they'll need. Essential hiking gear for beginners is a shorter list than most expect. The items that matter most are shelter, sleep, water, navigation, and first aid. Everything else is either a comfort item or a redundancy.
Clothing Layers and Technical Apparel
A proper layering system has three components: a moisture-wicking base layer, an insulating mid-layer, and a weather-resistant outer shell. Most hikers over-pack clothing more than any other category.
Technical apparel made from merino wool or synthetic fabrics earns its weight because it performs multiple functions. Merino wool base layers regulate temperature, resist odor for multiple days, and dry faster than cotton. Synthetic fabrics offer similar moisture-wicking properties at lower cost. Either choice beats cotton for conditions where you might sweat or encounter rain.
Bring one outfit to hike in, one to sleep in, and one layer more than you think you need for warmth. That covers most 3-season conditions.
Multi-Functional Gear That Earns Its Place
Every item in your pack should justify its weight by serving at least two purposes. This weight-to-purpose ratio principle is the fastest way to cut base weight without sacrificing capability.
Examples of multi-functional gear:
- A trekking pole that doubles as a shelter pole for ultralight tarps
- A buff or neck gaiter that works as a hat, face covering, or wrist wrap
- A multi-tool that handles knife, saw, and emergency kit functions
- A hydration bladder that replaces both a water bottle and a dedicated hydration pack
The Gear Up & Go 14-in-1 outdoor multi-tool is a practical example: one compact item replacing several single-purpose tools.
How to Pack a Backpack for Balance and Load Distribution
Load distribution is where most packed bags fail, even when total weight is reasonable. A poorly balanced pack creates fatigue, throws off your center of gravity, and increases injury risk on uneven terrain.
The goal is to keep the heaviest items close to your back and centered between your shoulder blades and hips. This keeps the load's center of gravity aligned with your own, reducing the lever arm that pulls you backward.
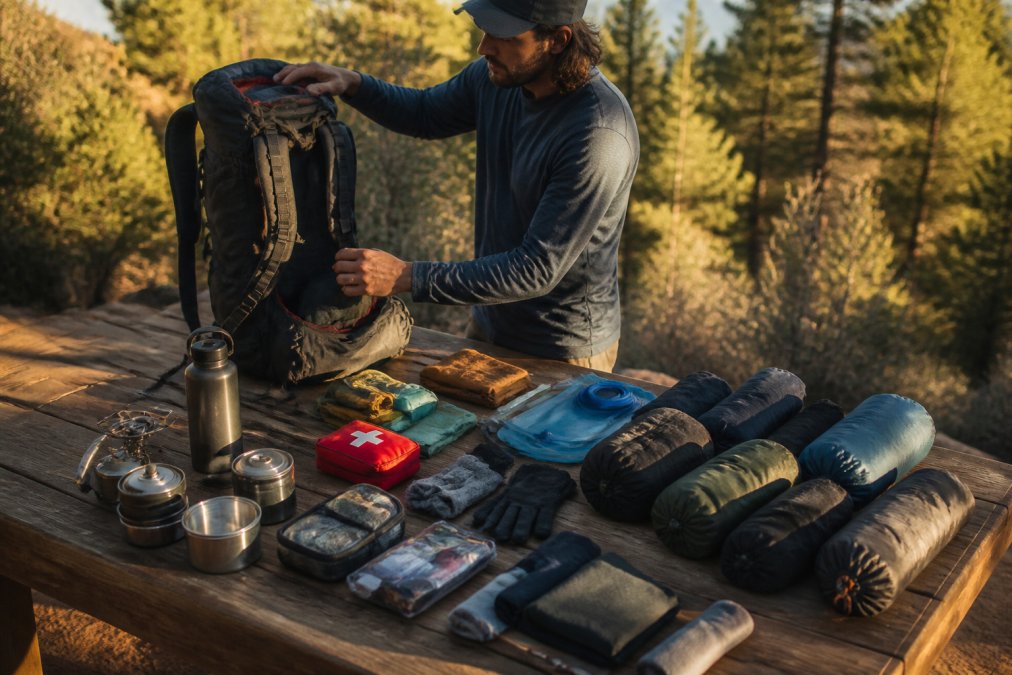
Packing Heavy Items vs. Light Items
Follow this zone system for a properly balanced pack:
Bottom zone (lightest items): Sleeping bag and sleep system components. These are bulky but light, creating a stable base.
Middle zone (heaviest items): Food, water reservoir, shelter system, and dense gear. Pack these tight against your back. This is the critical zone for center of gravity.
Top zone (medium-weight, frequently accessed items): Rain gear, insulating layer, snacks, navigation tools.
Hip belt pockets and outer pockets: Emergency kit, sunscreen, lip balm, phone.
A common mistake is loading the bottom with heavy items. This drops your center of gravity below your hips and forces your lower back to compensate on every step.
Packing Cubes, Compression Sacks, and Organization
Packing cubes organize and group like items so you find things without unpacking everything. Compression sacks reduce volume by squeezing compressible items into a fraction of their normal space.
Use both strategically:
- Compression sacks for your sleep system and insulating layers
- Packing cubes for clothing, organized by function
- A dedicated small pouch for your emergency kit
A well-organized pack loads faster at camp, which means you're moving sooner in the morning.
Best Lightweight Hiking Accessories That Actually Save Weight
The best lightweight hiking accessories replace heavier alternatives rather than adding to your load. Accessories that simply add capability without replacing something else are weight additions, not weight savings.
Accessories worth the weight:
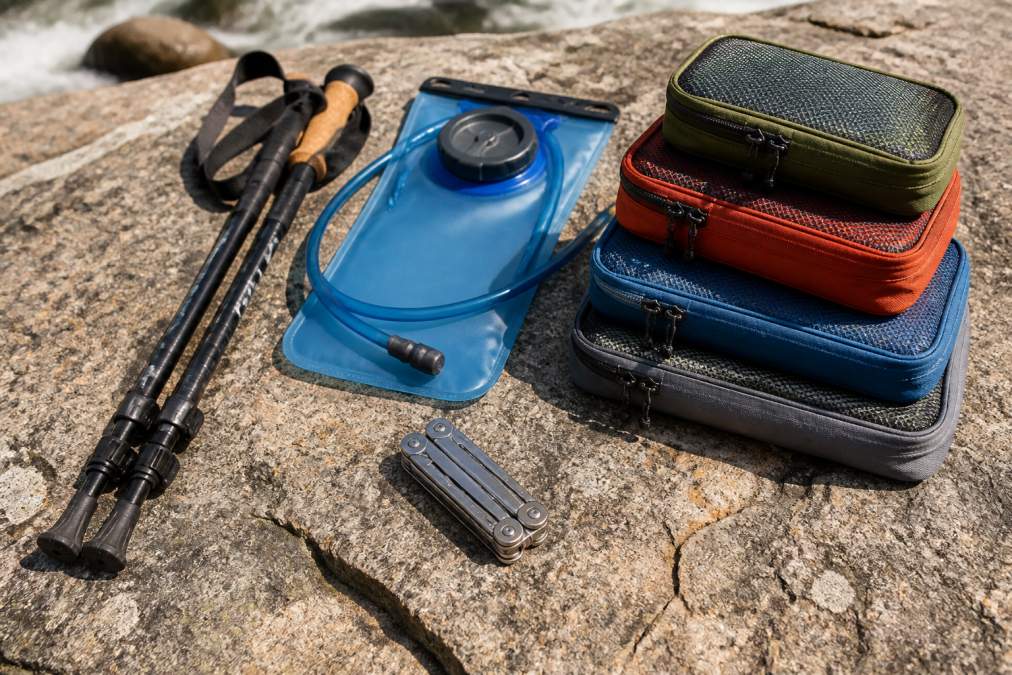
- Trekking poles: Reduce knee impact on descents and improve uphill efficiency. Collapsible carbon fiber models weigh under 10 ounces per pair.
- Hydration bladder: Replaces water bottles and integrates into your pack for hands-free drinking. Most 2L bladders weigh less than two standard water bottles.
- Lightweight headlamp: A compact headlamp under 3 ounces handles navigation, camp setup, and emergency signaling.
- Blister prevention tape: Weighs almost nothing. The alternative is a blister that compromises your entire trip.
- Compact multi-tool: Handles repairs, first aid assist, food prep, and gear maintenance in a single item.
According to REI's expert advice on backpacking gear essentials, the sleep system, shelter, and pack are the "big three" categories where weight savings have the most impact on total base weight. Prioritize ultralight options in those three before optimizing accessories.
Climate-Specific Packing Strategies for Different Trails
Generic packing guides miss that the same base weight feels completely different depending on where you're hiking. Climate-specific packing strategies account for the fact that a desert trail and an alpine trail require fundamentally different gear choices.
Hot and dry conditions (desert, high desert):
- Prioritize sun protection: lightweight long sleeves, a wide-brim hat, and high-SPF sunscreen
- Water capacity becomes critical; plan for more than you think you need
- Skip heavy insulation; a lightweight wind layer handles cool desert nights
Cold and wet conditions (Pacific Northwest, alpine zones):
- Waterproofing is non-negotiable; a breathable rain shell earns its weight
- Moisture-wicking base layers prevent the chill from wet cotton
- Add hand warmers and a thermal hat to your emergency kit
High altitude (above 10,000 feet):
- Temperature swings are extreme; the layering system needs all three components
- UV exposure increases significantly; sun protection is as critical as in desert conditions
- Navigation tools matter more where weather can change in minutes
Pack for the conditions you'll actually face, not the conditions you hope for.
Post-Hike Gear Audit: How to Pack Even Lighter Next Time
A post-hike gear audit is a structured review of what you actually used versus what you carried. The process takes 15 minutes and pays dividends on every subsequent trip.
Post-hike audit checklist:
- List every item you packed
- Mark each item: Used Daily / Used Once / Never Used
- Weigh the "Never Used" items
- Note whether you wished you had something you didn't bring
- Update your digital gear list with weights and usage notes
- Identify one item to replace with a lighter alternative before the next trip
The "Never Used" pile commonly reveals 1-3 pounds of gear that made the trip without being touched. That's weight you can eliminate immediately on the next outing.
As documented in the Appalachian Trail Conservancy's gear guidance, experienced long-distance hikers consistently report that their pack weight drops significantly over time, not because they buy more expensive gear, but because they learn what they actually use.
Carrying too much weight on trail is rarely a gear problem. It's a habits problem. The hikers who consistently pack light have built a system: they track weights digitally, audit after every trip, choose multi-functional gear over single-purpose items, and match their pack volume to their actual trip length. Gear Up & Go carries the tools that support that system, including tactical-grade 42L backpacks built for load distribution, 14-in-1 multi-tools that replace several single-purpose items, and high-capacity charging solutions that keep navigation tools and communication devices powered across multi-day trips. Build the habits first, then gear up with what actually earns its place in your pack.
Frequently Asked Questions
What is the 20% rule for backpacking?
The 20% rule states that your loaded pack should not exceed 20% of your body weight. For a 150-pound hiker, that means a maximum pack weight of 30 pounds. Ultralight backpackers often aim for 10% or less by cutting base weight through lighter shelter systems, sleep systems, and technical apparel. Staying within this range reduces joint strain, improves endurance, and makes it easier to pack light for hiking longer distances.
How much should a hiking backpack weigh when fully packed?
A fully loaded daypack for a 6-8 hour hike should ideally weigh between 10 and 15 pounds. Overnight and multi-day packs vary more, but the 20% body weight guideline applies. Base weight, everything except consumables like food and water, is the number to optimize first. Cutting base weight through multi-functional gear, a minimalist sleep system, and lightweight accessories gives you the most room to stay trail-ready without overloading your pack.
What is the best way to organize gear in a hiking pack?
Place your heaviest items, like your sleep system or shelter, closest to your back and centered between your shoulder blades to keep the center of gravity stable. Medium-weight items fill the main compartment around them. Lightweight or frequently needed items go on top or in outer pockets. Packing cubes and compression sacks help separate categories and prevent shifting. This load distribution reduces fatigue and keeps your pack balanced on uneven terrain.
What essential items should beginners bring on a day hike?
Beginners should carry water (at least 2 liters, or use a hydration bladder), a navigation tool, a basic emergency kit, moisture-wicking base layers, a rain shell, snacks, sunscreen, and blister prevention supplies. A compact multi-tool covers minor repairs. Skip duplicate items and anything with a single use. Choosing multi-functional gear from the start is the fastest way to learn how to pack light for hiking without sacrificing safety.
This article was written using GrandRanker